

Named Selection feature allows you to create named selections that can be transferred to the ANSYS Mechanical application, or used in the creation of some features. You can select any combination of 3D entities, including point feature points (PF points). Selections are performed through an Apply/Cancel property called Geometry in the Details View of ANSYS DesignModeler.

Named selections are very important parameters in ANSYS® Mechanical analyses. You can define your named selections on geometry and you can use them at further boundary condition definitions in ANSYS® Mechanical, Fluent, etc. It is a very useful tool to define boundary conditions in various interfaces of ANSYS®.
Named Selection with Geometry
Most people don’t know about this feature because it is not really obvious that it is there. If you have no Named Selections in your model, the Named Selections Icon in the toolbar doesn’t even show up unless you click on the Model top branch of your tree
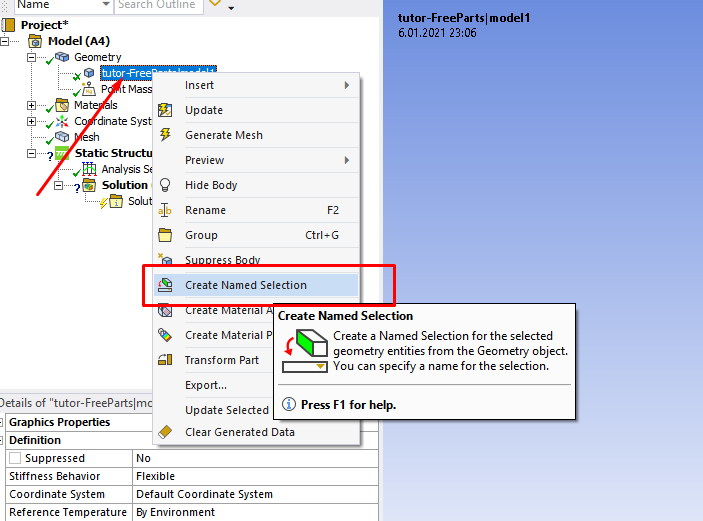
Click on the ‘Create Named Selection’ tab.
To generate named selections on ANSYS® geometries, right-click on geometry’s model subtab as shown by the red arrow above then click on the ‘Create Named Selection’ option as shown in the red box above.
Enter a Named Selection name.
Enter the name of your Named Selection after clicking on ‘Create Named Selection’. Define your name according to the boundary condition that will be defined in this named selection. For example, we said to this ‘wall’ that we will use it in CFD, etc.
The whole body is selected as default.
The whole body of geometry is selected in our Named Selection. Select your own geometric feature such as edges, faces vertexes according to your boundary condition in ANSYS® Mechanical.
As you can see that named selection is a very simple process using geometrical selection. However, you can also create named selections for nodes, faces and vertex without clicking! To do this, you should move to worksheet instead of geometry.
Named Selection with Worksheet
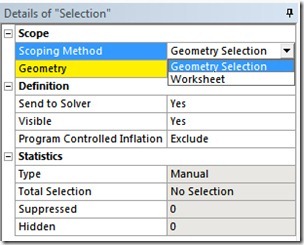
To create a Named selection using a worksheet, you simply clock on the NS icon. This adds a Named selection Branch and a Named selection to that branch. If you look at the details View for the Named selection you will see that the Scoping Method is set to Geometry Selection by default. Click on the Geometry Selection and you get a drop down menu that now offers you the choice of using the Worksheet. Make that choice:
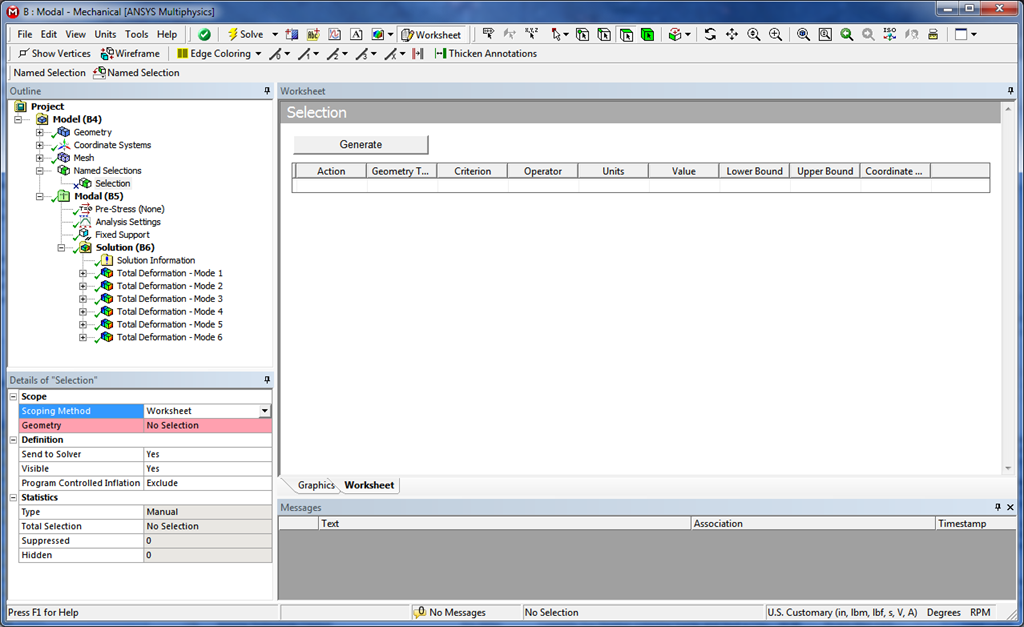
Now you should see a new tab in your graphics window called Worksheet, and in that Worksheet you should see a Generate button and a table. If it is too small to show the whole table, a scroll bar will be at the bottom and cover up that blank row. Don’t panic, it is supposed to do that.
This tool is pretty clever. You basically add rows to the table that act on geometry from top to bottom. In many cases you just use one line. But for more sophisticated selections, you can really stack them up and get complicated. After each line is executed, the active set changes based on what is on that row. The final active set is what goes into the named selection.
Lets take a look at the table and each column in it.

Action
This is the most important column. It tells workbench what you want to do in this step of applying the filter. Under action you have the following options:
- Add: Adds the entities defined by the row to the active set.
- This is a UNION in set theory
- For the first row in the table:
- This is a CREATE operation in set theory
- There is no “active set” so the first line add’s to a null set (xSEL,S,,, in APDL)
- For the second and subsequent rows:
- In order for it to work, the value in the Type column has to be the same. If they are not the same, then nothing gets selected.
- This is an OR operation. So if you have one line that selects all vertices with X > 0 and a second with Y > 0 you will get vertices that are X > 0 OR Y>0.
- xSEL,A,,, in APDL
- Remove: Removes the entities specified on the row from the set.
- Think of it as an unselect: xSEL,U,,, in APDL
- Filter: Selects a subset from the active set
- This is an INTERSECTION in set theory
- This is an AND operation. It puts everything in the active set that is also defined by the row in the active set.
- xSEL,R,,, in APDL
- Invert: Selects everything not in the active set of the current active set type, and makes it active
- This is a COMPLIMENT in set theory
- This is a NOT using the everything of the current type vs. the active set.
- xSEL,INVE in APDL
- Convert: Selects all of the entities of the type specified in the Geometry Type column that are connected to the active set and makes those entities the new active set
- Must go up or down in topology tree by one step: vertex <-> Edge <-> Face <-> Body
- When going up it selects ANY entity that is attached to the current select set. There is no way to specify just those that are fully defined
- xSLx in APDL: LSLA, ASLL, KSLL, LSLK, etc…
Geometry Type
Right now it only selects the standard geometry topology types:
| Workbench | CAD Name | MAPDL Name |
| Body | Solid | Volume |
| Face | Surface | Area |
| Edge | Curve | Line |
| Vertex | Vertex | Key Point |
Remember that you can only have one Geometry Type in the active set at a time.
Criterion
This tells the program what filter you want to apply to select geometry. The table below shows the different criterion and what Geometry Type’s they apply to:
| Vertex | Edge | Face | Body | Comment | |
| Size | X | X | X | Selects entities by whose Length (Edge), Area (Face), Volume (Body) fall within the specified values | |
| Type | X | X | X | Finds entities of a certain underlying shape: Body: Solid, Surface, Line Face: Plane, Cylinder, Cone, torus, Sphere, Spline, Faceted Edge: Line, Circle, Spline, Faceted | |
| Location X | X | X | X | You can specify a value or a range and you can also specify a coordinate system to use! | |
| Location Y | X | X | X | X | You can specify a value or a range and you can also specify a coordinate system to use! |
| Location Z | X | X | X | X | You can specify a value or a range and you can also specify a coordinate system to use! |
| Face Connections | X | Used to pick edges by the number of faces they are connected to: 0 would be all free edges, 1 would be all edge on only one face, 2 would be shared by 2 faces, etc… |
Operator
This is where you specify how you want to control your selection. You have your standard if() type operators as well as the ability to specify a range. For range you put values in the Lower and Upper Bound columns and for all others, the Value column. The options are:
- Equal, Not Equal, Less Than, Less than or Equal, Greater Than, Greater Than or Equal
- Range
Units
Like most things in Workbench, you can change the units here if you want.
Value
Here is where you put in value you want to select on (unless it is a range). Put in a numerical value for Criterion = Size or Location X/Y/Z. Use the values in the table above for Criterion = Type. And lastly, if you are doing Face Connections, put in the number of faces.
Lower Bound, Upper Bound
When Criterion is set to Range, you specify the range here.
The other thing you should know is how to modify your table. To change a value in a cell, just click on it. To delete a row, click on a cell in the row then RMB and select delete. Do the same thing to insert a new row before the currently selected row.
Lastly, remember to hit the generate button! If you don’t, it does not update and even though you have a green checkbox next to your NS in the tree, it is not up to date. You have to hit generate or select the NS branch and RMB->Generate Named Selections
References;
1-https://www.padtinc.com/blog/beyond-clicking-named-selections-move-to-the-worksheet/
2-https://mechanicalbase.com/center-start-angle-arc-drawing-in-autocadillustrated-expression/

Jayant Singh
Nice information about Named selection. if it possible to create a details blog or video on the factors affecting the named selection will be highly appreciated. Thank you for your information.
özgün
Hi,
Thank you very much for your recommendation. I will have a look at it.